Tuesday, October 27, 2009

Workstation 7 at Last!

This has been an exciting month with the release of Windows 7, the launch of Ares1-X (pending at time of writing), and the release of Workstation 7.  VMware announced earlier today the general availability of Workstation 7 and I personally can not wait (but will) to get my hands on it.  I have to plan this right though since the trial is for 30 days.  I think I have enough email addresses to last me until I get my VCP upgraded to v4 and hopefully a new Workstation 7 license.  I'm providing a collection of information on Workstation 7.  I hope it helps and if you think something should be added then please let me know.

Here's a few reasons to buy/upgrade Workstation 7
  • Full native support for ESX(i) 4 in Workstation - Recommendations
  • Support for Windows 7 including Aero feature*
  • 3D support - DirectX 9.0c, Shader Model 3, and OpenGL 2.13D
  • Driverless Printing
  • Pause the VM to quickly and temporarily free up resources for other VMs or applications.
  • Greater VM resource options
    • 4 virtual processors or virtual cores
    • 32GB Memory per VM
  • SmartCard support
  • 256-bit AES Encryption
  • Integration with Visual Studio, Eclipse, and the SpringSource Tool Suite
    (Hoping that eventually PowerShell Plus or some other PowerShell IDE will integrate)
  • More Guest OS Support
*Aero feature requires following hardware support

  • Intel Dual Core, 2.2GHz and above or AMD Athlon 4200+ and above
  • nVidia GeForce 8800GT and above or ATI Radeon HD 2600 and above
  • At least 3GB of host system memory

Purchase Info:
  • Buy for $189
  • Upgrade from Workstation 5.x or 6.x for $99
  • Free upgrade if you purchase Workstation 6.5 between October1, 2009 and November 30, 2009.
    http://www.rebates-vmware.com/ws7upgrade/
  • Pass VCP for free license.
Release Notes
http://www.vmware.com/support/ws7/doc/releasenotes_ws7.html

Workstation 7 Documentation
http://www.vmware.com/support/pubs/ws_pubs.html

Free Online Training from VMware
http://mylearn.vmware.com/register.cfm?course=53111

Workstation FAQ page
http://www.vmware.com/products/workstation/faqs.html

 Update:
Duncan Epping beat me to a post on VMware Player 3.  Check his post out at http://www.yellow-bricks.com/2009/10/27/vmware-player-3-0/
Features are pretty comparable.

Tuesday, October 13, 2009

Who's VM is This? Custom Fields for VMs with PowerShell

Being new into an environment, it is often difficult to sort through the hundreds of new servers that are now under your care. Seasoned veterans in your organization will already have intimate knowledge about each system that they support, and more often than not it is not fully documented as to who owns what system. I find myself often asking my new coworkers..."Who's VM is This?"

You may already know that within vCenter server you can easily add notes to VMs by selecting the VM, clicking on the Summary tab, and look under 'Annotations'.

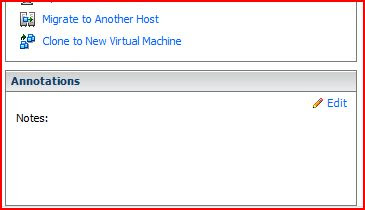
Clicking on the Edit link will display the "Edit Custom Attributes" box where you can enter notes.


You should also see a button for creating custom Attributes. Attributes are custom fields (which is important to remember when using PowerCLI) that you can set name and values for at your pleasure. This can be applied to Hosts, Virtual Machines, or Globally which will apply the new attribute to both Host and Virtual Machine.


Note: Adding a custom attribute to one Host or Virtual Machine will add that attribute to all like systems. It does NOT populate the value for this attribute on other systems however. This is still our responsibility. Likewise if you delete an attribute it will also remove it and all values from like systems. These values are stored in the vCenter database and could possibly be recovered from your database backup. I have not tried testing this but have verified that the data is there and reference the VM in tables VPX_FIELD_DEF and VPX_FIELD_VAL.

In our environment it was my goal to create a custom attribute for "Owner", "Director", "App Owner" so that I could easily run an "Owners Report" that could be used for change notifications.

If you've read any of my other posts you probably know what's coming next...A Script!

Since there are so many VMs in my environment and I was relying on other people to populate the necessary data I created an Excel spreadsheet on a shared drive with a list of the VMs and columns for Owner, Director, App Owner, and Notes (which I'll share a separate script for later).

While that information was being populated I put together a quick script to import the file (.csv) and implement the attributes.

$import = Import-Csv "\\server\share\VM-Owner-Info.csv"

$import | %{
$field = $_.Field
$value = $_.Value
$server = Get-VM -Name $_.Name

#Create/Set custom attribute based on CSV values
$server | Set-CustomField -Name $field -Value $value
}

Note: Each new custom attribute that is added will appear at the top of the annotations section, just above the previous attribute added. i.e. If you have an attribute that you wish to have on top, then make sure you add it last.

For the sake of simplicity and under reasonable time constraints I reformatted my completed excel spreadsheet so that each Field was isolated on it's own line along with the VM and Value. This involved an extra minute but knowing Excel pretty well you should be able to accomplish this very quickly as well. My .CSV thus looks as such:

Name,Field,Value
Josh-Test-01,Owner,Josh 1
Josh-Test-02,Owner,Josh 2
JoshNet-DC,Owner,Josh 3
Josh-Test-01,Director,Jason 1
Josh-Test-02,Director,Jason 2
JoshNet-DC,Director,Jason 3
Josh-Test-01,App Owner,Rod 1
Josh-Test-02,App Owner,Rod 2
JoshNet-DC,App Owner,Rod 3


The script will process each line and assign the custom attribute accordingly. Since this serves the purpose and within the right time criteria I consider it in order. I'll be working hard later to allow you to generate an easier to manage table/CSV where the script will determine the Attribute name based on the header, and enter the value accordingly.

Host,Owner,Director,App Owner
Josh-Test-o1,Josh 1,Jason 1,Rod 1
Josh-Test-02,Josh 2, Jason 3, Rod 2
JoshNet-DC,Josh 3, Jason 3, Rod 3


This would be easier to edit and manage in Excel rather than having to define the attribute and value on each line. If anyone has some insight on how to make this possible since my initial attempt failed then please let me know.

Once run, the final product appears as so on all VMs:

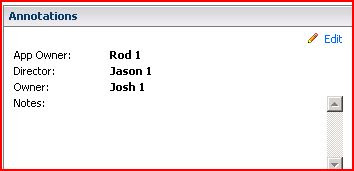
I can now see the Owner, Director, and App Owner for this VM. Certainly you can use whatever attributes you'd like. I highly recommend using Excel and collaborating with your team to gather the pertinent information.

Now that you have this data populated for your VMs it is only really good to you if you can get it out. The PowerCLI Blog has a post for moving this data between vCenter servers (in the DB as you recall). I have modified it slight where it will display the attributes and their values for each VM.

function Get-CustomField {
param($item)
foreach ($cf in $item.CustomFields) {
if ($cf.Value) {
$field = "" | Select Key, Value, EntityName
$field.Key = $cf.Key
$field.Value = $cf.Value
$field.EntityName = $item.Name
Write-Output $field
}
}
}
$fields = Get-VM -server $server1 | Foreach { Get-CustomField $_ }
$fields


You can also use the quick one-liner:

Get-VM | Select -ExpandProperty customfields

Hope you find this useful.

Links:
Eric Siebert on Custom Attributes - http://itknowledgeexchange.techtarget.com/virtualization-pro/using-custom-attributes-with-vcenter-server/

When researching additional information for this post I came across where Arne Fokkema also created a one-liner to populate custom attributes from a .CSV file. It seems he beat me to it by about a month and I somehow didn't find it before creating my own. Here are two links from his blog where he performs the same task as well as adding notes as I mentioned earlier.
http://ict-freak.nl/2009/08/14/powercli-add-notes-to-multiple-vms/
http://ict-freak.nl/2009/08/17/powercli-set-custom-fields/

http://blogs.vmware.com/vipowershell/2009/05/moving-custom-fields-from-one-vcenter-to-another.html

Update Service Console Memory across Environment

I recently noticed a host in my environment that had its Service Console Memory set to 272MB which is far lower than recommended but is default. Since it is possible that others in my environment are also misconfigured I decided I needed a script to change this. A quick search on the internets led me to:

http://ict-freak.nl/2009/07/17/powercli-find-and-set-the-service-console-memory-value/

In his post, Arne Fokkema demonstrates how to generate a report on Console Memory in the environment using his script:

Get-VMHost | Sort Name | Get-View | Select Name, `
@{N="Service Console Memory";E= {"" + `
[math]::round($_.Config.ConsoleReservation.ServiceConsoleReserved / 1MB, 0) + " MB "}}

Fortunately he also provided a script for modifying this setting. I have it written below with a small modification that takes advantage of PowerShell's ability to perform calculations based on unit (KB/MB/GB). Functionally it isn't any different then Arne's script, but I found it a little more user friendly.

Get-VMHost | Get-View | % {
$_.Name | Where { $_.Config.ConsoleReservation.ServiceConsoleReserved -ne (800*1mb) }
(Get-View -Id $_.ConfigManager.MemoryManager).ReconfigureServiceConsoleReservation(800*1mb) }


Thanks to Arne for his post and work. Take a look at his blog at http://ict-freak.nl/

Tuesday, October 6, 2009

NTP. PowerShell. It's About Time.

There's no doubt that time is critically important in a computing environment. Given this sensitivity, and the recent recognition that we had rogue hosts improperly configured, I decided to crank out a script that would analyze our environment. I wanted to find whether the NTPD service was running, what the NTP server configuration was, and provide a report of this. Additionally I wanted to have the option (with commenting) to automatically make corrections.


You can find the NTP settings in vCenter server by selecting the host, clicking on the Configuration Tab, and clicking on Time Configuration under Settings

Fortunately our time errors were in or Dev/QA environment and no harm was done but this led me to think "What time is it on our hosts?" Naturally my first step was PowerShell one-liner and since I'm trying to learn I wanted to start out on my own for a little while before pining for help on Google (actually I usually check Hal Rottenberg's book and Alan Renouf's blog http://www.virtu-al.net/ first).

After browsing the commands available I was able to construct this little one-liner to list the host and the running status of each host:

Get-VMHost | Select-Object Name,@{Name="NTP Running";Expression={($_ | Get-VMHostService | Where-Object {$_.key -eq "ntpd"}).Running}} | Sort-Object -Property "NTP Running"

This provided me the following output (redacted of course) showing the host name and a boolean response to whether the NTPD service is running.

Great! I see I have 5 servers that showed False for the NTPD service running. Now time to figure out how they are configured and then either configure or simply restart the service. I now needed to include the NTP server. Running on a little success with quitting time approaching, I hopped on virtu-al.net and lo and behold there was a post with exactly what I was doing. http://www.virtu-al.net/2009/08/14/powercli-do-you-have-the-time/

Adding @{N=“NTPServer“;E={$_ |Get-VMHostNtpServer}}, slightly modified into the Select-Object allowed me to see the NTP server setting as well

Get-VMHost | Select-Object Name,@{Name="NTP Server";Expression={$_ | Get-VMHostNtpServer}}, @{Name="NTP Running";Expression={($_ | Get-VMHostService | Where-Object {$_.key -eq "ntpd"}).Running}} | Sort-Object -Property "NTP Running", "NTP Server"

I immediately notice that I have a couple of hosts pointing to 127.127.1.0 which tells me for sure that things are not configured properly for some hosts in our environment and which would explain why the NTPD service is not running. The remaining servers appear to simply have the service stopped and getting that started is pretty easy with the one-liner provide by Virtu-Al.

Get-VmHostService -VMHost MyHost | Where-Object {$_.key -eq “ntpd“} | Start-VMHostService

Being a scripter the way that I am I really do not want to have to run this for each of the 4 hosts that need their service restarted so time for another script that will update all hosts involved.

I took a break and decided that I wanted a maintenance and reporting script all in one. The end result was to generate a NTP status report that exported the data to a date named CSV. This made the script a little more flexible and allowed me to run multiple steps on the resulting data while providing historical data if I need to help trace NTP problems.

The new script prompts the user (notes for automation are added) as to whether services need to be started on hosts where NTPRunning = False. To solve the other issue of incorrect or non-configured NTP server I included an If statement that checks the configured NTP server and prompts the user and requests a new NTP server/IP to change to. The top of the script provides a place to put a preconfigured value in case you wish to apply this to a maintenance plan or bulk change NTP values.

Download Script - NTP-Maintenance-Generic.txt (convert to .ps1)


--------------Full Script-----------------------------------

#This script is designed to report the status of NTPD service running in your environment by checking each host.
#You are then able to change the configuration of hosts based on old and new values.
#Also able to restart stopped services.
#You should run this script on a machine that has vSphere PowerCLI installed and as a user who has appropriate vCenter server permissions
#to manage host services and configurations.

#Add-PSSnapin VMware.VimAutomation.Core #In case you need to load the VMware snap-in

Connect-VIServer -Server server.domain.com #Enter your vCenter Server

$NtpServer = "10.10.10.10" #Provide your default NTP Server. This will be used as default so entering a NTP server when prompted is not necessary
$OldNtpServer = "10.10.10.11" #Leave set as 127.127.1.0 as default unless you wish to change settings in your environment
$DefaultNtpServer = "127.127.1.0" #NTP Server Value that is set on a fresh ESX installation.

#Location based on Date
$date = Get-Date -UFormat %Y%m%d
$ExportLocation = "C:\NTP-$date.csv"

#Location where you would like report to be saved to.
#$ExportLocation = 'C:\NTPReport.csv'

$NTPHosts = Get-VMHost | Select-Object Name,@{Name="NTPServer";Expression={$_ | Get-VMHostNtpServer}}, @{Name="NTPRunning";Expression={($_ | Get-VMHostService | Where-Object {$_.key -eq "ntpd"}).Running}} | Sort-Object -Property "NTPRunning", "NTPServer"

$NTPHosts | Export-Csv $ExportLocation -NoTypeInformation
& $ExportLocation #Opens generated report file

$Restart = Read-Host "Would you like to start NTPD services or change NTP configurations on hosts? (y/n)"
#$Restart = "y" #Comment above line and uncomment this line if you wish to automatically restart services.
If ($Restart -eq "y"){
Import-Csv $ExportLocation | % {
$vmhost = $_.Name

#Checks the NTP configuration against a value previously determined at the top of script.
If (($_.NTPServer -eq $OldNtpServer) -or ($_.NTPServer -eq $DefaultNtpServer)){
$NtpInput = Read-Host "Some servers are configured with NTP set as $OldNtpServer or $DefaultNtpServer and may need their NTP settings reconfigured. Please enter NTP Server FQDN or IP address. <$NtpServer> is default."

If ($NtpInput -ne "") {
$NtpServer = $NtpInput #Sets $NtpServer to the inputted value and does nothign if left blank. This allows use of default when value is consistent in the environment.
}
Add-VMHostNtpServer -VMHost $vmhost -NtpServer $NtpServer | Where-Object {$_.NTPServer -eq $OldNtpServer}
Remove-VMHostNtpServer -VMHost $vmhost -NtpServer $OldNtpServer
}

#Now time to restart any NTPD services that are currently not running.
If ($_.NTPRunning -eq "False") {
Get-VmHostService -VMHost $vmhost | Where-Object {$_.key -eq "ntpd"} | Start-VMHostService
}
}
}
Write-Host "Process Complete"

Video Card Hardware - vSphere 4

The boss is out this week and I got all of my work done for the day so I thought I would throw up another post that I have been working on. Blogging, and most anything else, is more difficult with a newborn in your life but I wouldn't have it any other way.

I was recently messing with vSphere in my lab environment and tweaking hardware information to determine what was new with vSphere and hardware version 7. One thing that appears to be added is the ability to edit Video Card settings. I began by adjusting the video ram to 32mb and playing with the VM. Imagine my surprise when trying to vMotion the VM and I received the error:


A
general system error occurred: Failed to write checkpoint data (offset 33558328, size 16384): Limit exceeded KB 1011971

This is apparently a result of the vRAM assigned is greater than 30MB. This can be
reduced in vSphere by:
  1. Shut down the VM
  2. Right click on the VM in the inventory and select Edit Settings
  3. Click on Video Card
  4. Change value under "Enter total video RAM" to below 30MB or select "Reserve memory for the following selection" radio button.

Given this limitation I wondered what effect that may have if you have specific hardware needs for VDI or desktops in general.

Display Resolutions at 24bit color depth

Resolution

Video Ram (MB)
24bit color

Video Ram (MB)
32bit color

2 Display
24bit color (MB)

2 Display
32bit color (MB)

800x600

1.37

1.83

5.49

7.32

1024x768

2.25

3

9

12

1280x1024

3.75

5

15

20

1600x1200

5.49

7.32

21.97

29.3

1152x864

2.85

3.8

11.39

15.19

1280x800

2.93

3.91

11.72

15.63

1440x900

3.71

4.94

14.83

19.77

1680x1050

5.05

6.73

20.18

26.91

1920x1200

6.59

8.79

26.37

35.16


Fortunately the only scenario listed here that exceeds 30MB is when running 1920x1200 on two monitors. There are more configurations available but I thought this would be high on practical limit. I sincerely doubt there will be too many people screaming for dual monitors at this resolution.


On the other side of the coin, attempting to run 16bit on lower resolutions yields the error that "The video memory is limited between 1.17 MB and 128 MB. Select different number for the monitors, screen resolution, or color depth."


Running multiple Displays requires that the Virtual Machine Version be at version 7. You can do this by Right Clicking on the guest VM and selecting "Upgrade Virtual Hardware" You will receive the following warning. Keep in mind that ESX 3.5 does not support version 7 so make the upgrade wisely.


Running multiple displays can also force you to consume more video memory causing you to exceed the 30MB limit for vMotion.


I recently posed the question to a VMware sales engineer about what effect this might have on hosts when utilizing virtual desktops and needing that additional video memory resources. He assured me that he does not know of anyone reaching a level of contention but it is something they will be investigating further. I'm open to any additional information that someone may have on the subject.

Configuring Network with PowerCLI and .CSV File

A couple of weeks ago I was in need to configure several new ESX servers with multiple NICs, vSwitches, and VLANs. Since I'm not one to do the same thing over and over again I turned to scripting. To further complicate things I wanted to allow the same script to create vSwitches, configure vMotion switch, add port groups, and create NIC Teams all from a prepopulated .CSV file. I'm doing this primarily so that all configuration could be done before the server arrived and so that I could create "Switch Profiles" when I add new hosts to clusters.

In the end I developed a script that reads from a .CSV file and then creates the desired switching. The first column tells the script what type of addition it is and the script processes the information for that object accordingly. I've noticed a few others have been posting recently about scripts on setting up portgroups, etc. and thought it was time to no longer keep this to myself (i.e. finally found the time to post). I too would like to also credit Hal Rottenburg's book Managing VMware Infrastructure with Windows Powershell which was very helpful for this and many other scripting projects I will be posting soon. Mike Laverick's post linked below helped in configuring the vMotion switch.

I hope you find this helpful. It has been HUGE in my environment.

Download the files here:
ESX-ConfigureSwitchCSV-Generic.txt
esx_switching_generic.csv

Links where others discuss switch configuration with PowerCLI.
http://halr9000.com/article/828
http://www.holy-vm.com/2009/10/01/adding-port-groups-with-powercli/
http://www.rtfm-ed.co.uk/?p=1514


Text of Script w/out comments

$getinfo = Import-Csv "\\server\share\file.csv"
Connect-VIServer -Server vCenterServer

$getinfo | % {
$Type = $_.Type #!!!! Case Sensitive !!!!!!
$gethost = Get-VMHost -Name $_.HostName
$SwitchName = $_.SwitchName
$PortGroup = $_.PortGroupName
$Nic = $_.NIC
$VLAN = $_.VLAN
$IP = $_.IP
$Subnet = $_.Subnet
$kernelGW = $_.KernelGW

If ($Type -eq "Switch") {
$gethost | New-VirtualSwitch -Name $SwitchName -Nic $Nic
}
If ($Type -ne "vMotion") {
$getswitch = Get-VirtualSwitch -VMHost $gethost -Name $SwitchName
}
If ($Type -eq "Team"){
$getswitch | Set-VirtualSwitch -Nic $Nic
}
IF ($Type -eq "Portgroup") {
$getswitch | New-VirtualPortGroup $PortGroup -VLanId $VLAN
}
IF ($Type -eq "vMotion") {

$newvswitch = New-VirtualSwitch -VMHost $gethost -Name $SwitchName -Nic $Nic
$vmotion = New-VirtualPortGroup -VirtualSwitch $newvswitch -Name $PortGroup
New-VMHostNetworkAdapter -VMHost $gethost -PortGroup $PortGroup -VirtualSwitch $newvswitch -IP $IP -SubnetMask $subnet -VMotionEnabled: $true

$vmhostnetwork = get-vmhostnetwork $gethost
set-vmhostnetwork -network $vmhostnetwork -vmkernelgateway $kernelGW
}
}